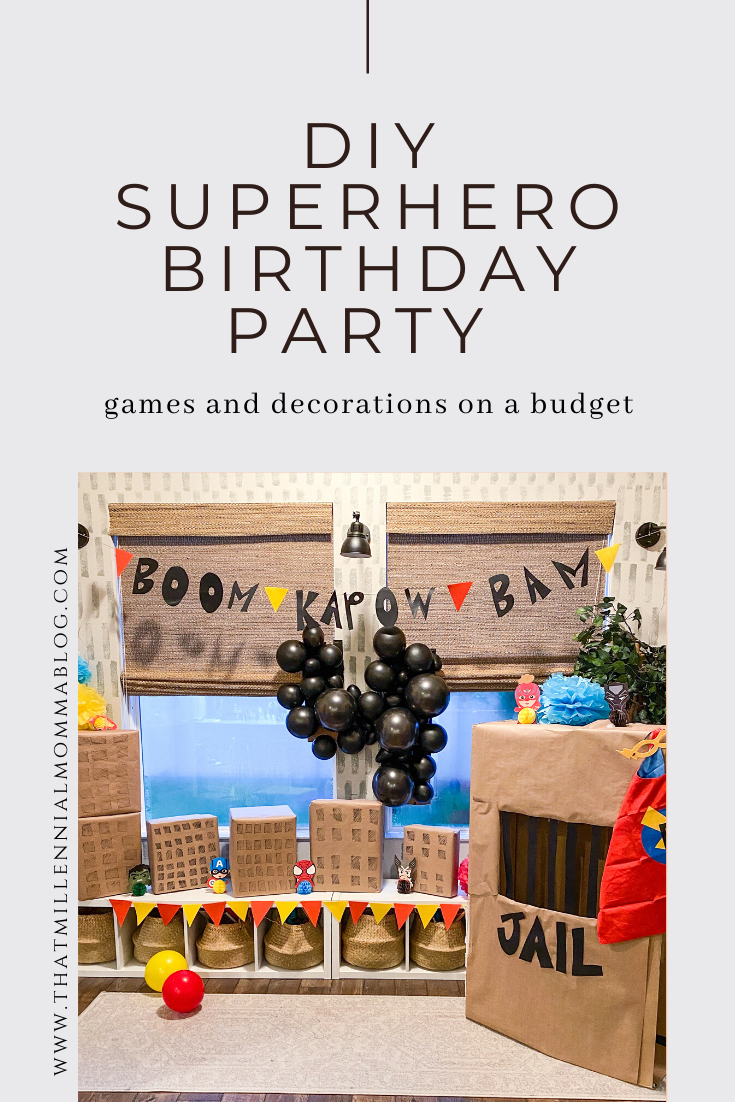
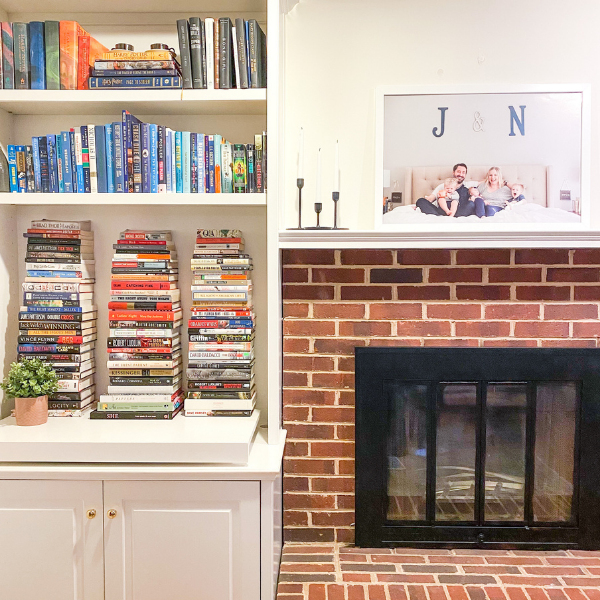
Easy DIY Fireplace Makeover

When we first moved into our new home, the biggest eye sores and the first thing that I knew needed updating were the fireplaces. The fireplace in the main level was manageable - just a tad too brassy. But the fireplace in the basement was a strange combo of gold and brass that burned my eyes. After some Pinteresting, I realized that a quick fix was only minutes away and under $10.

How to Update a Fireplace

Like I mentioned, this was an update that I knew I wanted to do quickly. However we JUST moved into this house and I am not 100% where the design of the whole house will eventually end up. I have ideas, but opting for a large scale update right now wasn’t in our best interest in design…or time.

But if you are in the market for a larger scale fireplace makeover, here are some of the fireplace makeover ideas that I came across.

How to Paint a Fireplace Surround

I quickly realized that painting the painfully brassy gold fireplace surround would be quick and easy, making this the perfect DIY for a mom who has to juggle working, carline, and naps. Here’s how I got the job done in one day.

High Heat Paint for Fireplace

The key thing in this easy fireplace DIY is the high heat paint for fireplaces. You cannot grab any sort of spray paint that you might have lying around the garage. This project requires a specific paint because…well the fireplace can produce high heat - genius!

I imagine that using a regular spray paint could result in (1) it melting and (2) it could produce some sort of toxic fumes. Don’t quote me on that, but just the thought that it might spew toxins into my home was enough to convince me to buy the good stuff.

There are several brands of high heat fireplace paints, as well as several styles. Initially, I planned to use the high heat paint from a can. I thought that would produce fewer fumes than spray paint. However, buying the canned version became difficult. It either took too long to arrive or was way overpriced.

So the neat freak in me had to take a backseat, and I ordered the high heat fireplace spray paint. The idea of spray painting inside was daunting for two reasons - fumes + spray getting all over the place. Here’s how I handled both of those.

Preparing Your Fireplace Surround

This is one of those projects where you spend the majority of your time preparing to spray paint the fireplace vs. actually spray painting the fireplace. And honestly, it makes a big difference.

The two things you need are likely already lying around your house - cardboard and newspaper. The newspaper will be taped to cover up all the surfaces that touch the fireplace surround - the glass and in my case the brick surrounding the surround. This was the most time consuming part.

I am not sure what this says about the construction of my fireplaces, but I was able to use cardboard between the fireplace surround and the brick. It took a little muscle, but I was able to shove that cardboard right in there, which created a pretty fool proof spray guard.

In addition, I also held a piece of cardboard between the brass surround and the brick as I spray painted as another spray guard.

Spray Paint Fumes

Once I opted for the spray paint, I knew the fumes were going to be an issue. There are two ways around this.

The first, and the one that I decided against, is likely safer - remove the fireplace surround. This was my original intent, but once I poked my head in my fireplace, I realized I didn’t want to mess with removing anything. I visualized finishing the spray painting and then not being able to get the doors back on.

The alternative is the newspaper-and-cardboard-keep-the-doors-on method. But this way requires spray painting indoors. Luck was on side because both fireplaces are near large doors. I waited for a nice day when I wouldn’t mind having the doors open while painting and drying.

In addition to proper ventiliation, I had a box fan in the room pushing the fumes out the open door. I grabbed this affordable box fan from Amazon to go with the AirFort that I got the kids for Christmas. It did the job perfectly.

Hot Tips

Alright, once you’ve got everything prepared - newspaper aligned, cardboard at the ready, box fan on + doors open, it’s time to do this thing. Here are some tips that made this work for me:

  1. Thin layers

  2. I didn’t degrease or really clean the surround like some tutorials recommend. That is likely the proper way to do this, but I had no issue with paint adhering to the surround. If you choose to be lazy like me, just make sure there is no dust or visible dirt on the surround.

  3. Have a smaller handheld piece of cardboard that you use as a straight edge.

  4. Open the doors slightly to start. That way you can spray the interior and exterior without smudging.


No Cost DIY Ghost Garland

easy diy halloween garland .png

If you’re looking for the easiest Halloween decor that you can throw together with all the kids in under an hour, then you’re in the right place! And if you want that easy Halloween decor to be free, then you are REALLY in the right place.

Here’s all you need for a No Cost Scary Easy DIY Ghost Garland:

Supplies for Easy Halloween Garland Ghosts:

Tape

Yarn/String

Tissues or napkins

Sharpie

Scissors

How to Make an Easy Ghost Garland:

  1. Unfold your napkin and lay it flat.

  2. Ball up another napkin and place it in the center.

  3. Wrap the open napkin around the balled up one and create your ghost head by pinching the top.

  4. Secure the head with a piece of tape.

  5. Use a sharpie to draw your ghosts’ face.

  6. Repeat until you have enough ghosts to fill your garland.

  7. Secure ghosts to string and hang!

Happy Haunting!

diy ghost garland. png

DIY Woven Headboard

diy woven headboard idea

Finding affordable and stylish furniture for a kids rooms is always a struggle. Often you sacrifice style if you are sticking to a budget or you have to get a second mortgage to get the look you want.

As the parent of two boys under 5 sharing a room, I knew that spending an arm and a leg for something that would eventually be covered in boogers and used as a backboard for basketballs was not in the cards when we upgraded them to big kid beds.

However, I wasn’t content to get a basic frame that didn’t add anything to the aesthetic of their room. Plus, a large portion of the beds that you can get for a low budget have spots where kids could easily get stuck or fall out. With that in mind I decided to try a DIY Woven Headboard on an affordable bed frame.

I am not one to jump on the opportunity to use power tools, so I knew that I didn’t want to try my hand at constructing a full headboard from scratch. If that is what you’re looking for, check out this diy headboard tutorial.

I knew that I wanted to do a hack, so I headed to Pinterest and did the only logical thing - search ‘IKEA Headboard Hack’. I kept stumbling upon a lot of texture, which I loved. I also loved that adding texture and a neutral-ish pop of color to the room would allow for their style to evolve without me having to update their headboards for quite some time.

In the end, I bought the IKEA Tarva bed frame for just under $100. When looking for a frame for this hack, grab one that has a rectangular border.

How do you make a woven headboard?

The supplies needed for this diy headboard are limited and things you likely already have around your garage.

Supplies:

Scissors

staple gun

staples

canvas webbing

To keep this project budget friendly, I opted for canvas strips vs. leather or another material. This is the exact canvas that I purchased in hunter green. Some other cool options for materials include leather or rope like this Better Homes and Garden example.

Instructions

  • Measure twice, purchase webbing once. Once you’ve chosen your headboard and material, you will have to do some math to make sure that you purchase enough product.

  1. Measure the length and height of the bed frame. Here is a visual of what I’ll be using as an example.

woven headboard - body (1).png

Measuring horizontal strips

  1. Once you’ve chosen your webbing, note the width of the strips. Measure how many strips will fit in the height of the entire frame. Divide the height of the frame by the width of the webbing strips. For example, if the height of the part of the frame that you will be covering is 48” and you webbing is 12” wide, you can fit 4 strips on that frame.

  2. You will have to add some length to each strip to wrap it around the back of the frame. I would suggest adding 4”. So for this example, let’s say that the true width of the headboard is 64”. Add 4” and consider the width to be 68”.

  3. Then multipy the number of strips by the length of the frame that includes the extra inches (68” in this example). We calculated in the last step that we need 4 strips. If the length of the frame is 68”, you would multiply 68 by 4 to determine that you will need 272 inches of webbing for horizontal strips.

Measuring vertical strips

  1. Since this is a woven headboard, you will also need to account for the vertical pieces of webbing. This is a bit more up to your discretion. Say you want to have vertical strips 5.

  2. Take the number of vertical strips that you want and multiple it by the width of the frame + 4 inches (to account for wrapping the strips around the back again). In this example the width is 48” so you would multiply 52 by 5 to get 260 inches.

  3. Now you know that you need 272” across and 260” vertically of your webbing, you just add to determine that you need 532” total of webbing. Most webbing is sold in yards so now just convert your inches to yards and you know how much product to buy.

  • Start construction by securing the vertical strips. Attach the top of one strip to the back of the top of the headboard using your staple gun.

PRO TIP: Use two staples each time you staple to secure it tightly.

  • Pull that strip VERY tightly and wrap it around the bottom of the headboard. Secure with two staples. Pull it so taut that you break a light sweat. Then trim the excess with scissors.

  • Continue down the entire headbaord. Space them based on the final look that you want. My turned out to be about 2 inches apart.

diy woven headboard
  • Next you will secure the horizontal strips. STOP AND READ THIS NEXT PART TWICE.

  • Weave the horizontal strips without connecting the ends. Alternative going over and under the vertical strips that you just secured. Once the horizonal strip is woven through the vertical strips, use your staple gun to secure the end where you just trimmed your last strip first.

  • Then secure the end with the rest of the roll of webbing. Pull taut and trim.

  • On the next horizontal row, start the opposite of the strip above. For example, if you started your first horizontal row by going over the vertical strip first, start the second horizontal row by going under the vertical strips.

diy headboard ideas

There is a lot of wiggle room on this DIY woven headboard project. Try to keep distances between strips consistent, but if they end up off or crooked, you can literally wiggle them into place. Plus, a little DIY charm never hurt anyone.

So how much did it cost? This is the best part - this project was $180 including the purchase of the bedframe. The only thing that I had to purchase aside from that was the canvas webbing. If you have to purchase a staple gun, they really are quite affordable.

If DIY isn’t your jam, here are some woven headboards for sale. But I warn you, they aren’t cheap.


DIY Heart Crayons + FREE Printable Valentine's

diy crayons + valentines body .png

With less than a week to go until Valentine’s Day, ordering cute gifts is becoming less of an option. Enter my free printable valentines + DIY Crayons.

While these printable valentines were intended to be gifted alongside some freshly made crayons (hence the ‘color my world’ pun), they work just as well gifted with a small bag of allergy friendly Valentine’s Day candies.

I would recommend that you print these on cardstock or heavier paper if you plan to attach crayons to them. You could pop on one of these double sided adhesive stickers right onto the valentine and put the crayons on top of that.

How do you make homemade crayons?

Homemade crayons are insanely easy to make and have the added benefit of reusing something that all parents have in their home - broken crayons.

Supplies:

Broken crayons (with wrapper peeled off)

Silicone mold

Instructions:

  • Preheat oven to 200 degrees.

  • Prep crayons by removing wrappers and breaking into small pieces.

  • Put the crayons in the mold - put similar colors together for a more aesthetically pleasing end product or encourage kids to try color blocking, color matching, etc. to make it an activity. Then put the mold onto a cookie sheet as this will help stabilize the flimsy silicone mold.

Pro Tip: have small kids do this. This is a great fine motor building skill.

  • Bake for 10ish minutes or until the crayons are completely melted.

  • Carefully remove the mold.

Use a toothpick to swirl any of the crayons for a fun tie dye effect.

  • OPTIONAL: I put my molds right into the freezer so that I could use them faster.

  • Pop them out once completely cooled.

diy crayons + valentines body (1).png

There you have it - thoughtful and sweet valentines for your kids or their classmates with little more than a click of the mouse and preheat of the oven.

If you don’t have themed mold, give regular muffin tins sprayed with cooking spray a try.

Target Valentine Mailbox Dupes

valentine’s crafts

I remember the days when I would wander the halls of Target. Ahh, I can smell the Starbucks and hear the children in other carts screaming now.

However, I haven’t stepped foot into Target for nearly a year - a feat that my husband and wallet are proud of, but makes me cringe. While I hope to return to the mothership soon, I have been coping by browsing their site and app endlessly. Recently I was looking for some Valentine’s arts and crafts ideas for preschoolers, and I came across these adorable mailboxes by Sprtiz.

I was able to exercise some restraint before hitting ‘add to cart’, and I realized that I could make these for my kids and personalize each to them. Of course I’m sure they would be happy with a racecar mailbox, but nothing rivals the love my son has for elephants.

How do you make Valentine's Day special for kids?

I wish with my whole heart that my sons could be in the classroom, experiencing Valentine’s Day with classmates. They would likely be writing their names on paper bags with little doilies and getting and receiving sweet treats with Valentine’s that come in those flimsy paper boxes with perforated edges - every kids’ dream!

But this year is different - we will be celebrating Valentine’s Day at home. The best way to make the most of that in my eyes is the go all out! We will be celebrating all the love we have within our home.

And that means personalizing it to our love. That’s where the valentine’s crafts come in to play - in the form of Target Valentine Mailbox Dupes. Inspired by the Spritz brand of Valentine mailboxes, I decided to mock up three mailboxes (one per child) in the shape of something that they love. I have two preschool age boys so we landed on a shark and elephant for them. I also have a one year old daughter who can’t exactly express affection outside of slobbery kisses, so we opted for a unicorn for her.

Once complete, the mailboxes will be set out and we will make and deliver valentines to each child. I also plan to leave the mailboxes at the front door so that our nearby grandparents can leave goodies for the kids too.

Target Valentine Mailbox Dupes - Instructions/Supplies List

I scoured my house for every single thing used in this valentine’s craft. Generally speaking, look first at the overall shape you want for each item OR the items that you have to use around the house. I personally had an old Greek yogurt container, some boxes, and a 2 liter bottle.

Unicorn

Valentine’s arts and crafts for preschoolers

The main structure of the unicorn is the old Greek yogurt container. I wrapped it in white paper and hot glued that together. I left the top exposed as I knew I would have to add elements to the top. I used the tassels from an old banner for the mane, tissue paper for the bangs, old faux flowers for the crown, and a piece of foam paper was rolled to be the horn. I cut and colored more white paper for the ears and drew the eyes with a Sharpie.

On the top I used an Exacto knife to cut a hole to fit the valentines.

Elephant

valentine’s activities

The elephant is made of a medium sized Amazon box. I made sure that all the seams were taped shut before I got to work covering the box in blue construction paper. Once the box was completely covered with blue construction paper, I drew the shape of the trunk on the paper. I followed that line to slice the box (and the attached paper). I also detached the bottom of the trunk from the edge of the box so that the trunk lifts up to allow a spot for the valentines. After that all that was left was freehanding and attached some ears and drawing the finishing touches with Sharpie.

Shark

valetnine’s crafts

The shark is made of a 2 liter bottle. I initially tried to paint the bottle with acrylic paint, but that did not adhere well. I opted to attach foam paper in a dark blue shade for the body. One large sheet was enough to cover the top of the bottle in a way that I would be able to cut the paper into a pointed shape instead of having to use the Exacto to chop the bottle. I did however have to use the Exacto to make the mouth, which doubles as the opening for the valentines. It looked a bit bare, so I added the lighter blue for some details and two fins. The teeth and the waves from which the shark is emerging are once again plain white paper.

What can I do for Valentine's Day on a low budget?

If you’re looking for a low to no budget idea for valentine’s crafts, this is it. Like I said, I spent $0 on each of these. I used things I had around the house for every single piece of these mailboxes. This is a great opportunity to get creative!

First consider the overall shape of the object you want for your mailbox - maybe a leftover Amazon box will work for an alligator. And an egg carton could be used to make scales on his back.

If you don’t have green construction paper to cover the box , no worries - use the kids’ craft paint or markers or old wrapping/tissue paper. This kind of find + seek game could be fun for older kids. For example, pose the question “Can you find something X shape?” or “First person to find something green gets a high five!” (High fives are accepted currency in my house - use whatever you’ve got!)


It doesn’t quite compare to the bliss of mindlessly wandering Target, but I was pretty proud of these little guys. And My kids are already excited for them too! I’d do just about anything to impose a sense of normalcy on them, so this was a win-win!

DIY Painted Wall Arch Tutorial

This post contains affiliate links.

Painted arch on wall

I’m back at it again! Painting something on a whim! Earlier this year I decided to add a little pa-zazz to our patio by stenciling a concrete patio out back. It turned out so well, that I decided to trust my instincts when I felt the urge to paint something else.

This time the target was my daughter’s nursery. We just recently switched up the kids’ rooms so her new nursery has a wall behind her crib vs a window. I hadn’t planned any over the crib decor for her previously since the window was right there.

I had a lot of ideas that included meaningful prints, mirrors, etc. that would achieve all my design dreams. However, generally speaking I don’t like putting anything over the crib from a safety perspective. For my first two kids, I hung a child’s size quilt over the crib. My thinking there was that if it was pulled down, it would be light and not maim my child. But even then, I had to attach the quilt with something point that could fall in the crib and become a choking hazard. (Have I mentioned that I have a bit of anxiety?)

NOTE: When you are thinking of how to decorate the wall above a crib, consider the fact that your newborn will grown up in that crib. They will stand and bounce and reach for things. When you start hanging things for a newborn, hang them out of reach of the grabby little hands of a toddler.

With all that rolling around in my mind, I landed on the idea of a painted nursery accent wall. This way the wall will be filled up, but there is literally nothing that my child could grab. Based on the decor in my daughters nursery, I knew I wanted to do a soft pink, but I wasn’t interested in a totally pink nursery or even a full pink accent wall. A few Pinterest searches led me to the painted arch accent wall trend.

I loved this idea because it meant minimal cutting in around molding which is my absolute least favorite part of painting. I hated this idea because I quickly realized that I would have to do a little math to achieve the perfect arch. The love and reduction in anxiety that this project would create outweighed the hatred for math, and I started assembling my supplies.

How do you paint curved lines on a wall?

I too was stumped by this, but the process really does make sense once you get going. Just prep yourself to go back to high school geometry. First things first, grab all your supplies.

Supplies for DIY painted wall arch

Paint (varies depending on size of arch- this project only required about 1/2 quart)

I used Behr Premium Plus Paint + Primer in one. I needed to do two coats for an even finish.

Cutting in brush

Roller frame (small or large depending on the size of the arch )

Roller (to fit frame)

Roller Tray (tip for usage below)

Pencil

String

Thumbtack

Measuring tape

Level

Instructions

  1. Determine the ideal width and height of your arch. If it is smaller or larger than a certain piece of furniture, measure the width using that piece.

  2. Using your level, draw vertical lines on your wall using a pencil (you’ll cover it with paint later) all the way up to the point where you want your arch to begin.

  3. Measure the exact midpoint of the width of your arch and put a thumbtack in the wall there. Some tutorials suggest a nail, but that just creates a large hole that you will then have to fill and sand before painting.

  4. Heres the math - You will be creating a compass with a piece of string attached to that thumbtack on one side and your pencil on the other. In order to do this, your string will need to be 1/2 the width of your arch plus however much you need to tie one end of the string to the pencil + the other end to the thumbtack. This is trial and error, but as a starting point I would suggest adding four inches. (So that makes it 1/2 the width of the arch plus 4 inches.)

    TIPS

    You could tie the string to the thumbtack before attaching it the wall. That way you only have to estimate how much extra string you will need to attach to the pencil end, which will likely be about 2 inches.

    When you think you have your string measured properly, do a test run on the wall without drawing on the wall. You can make adjustments this way without making a bunch of lines on your wall that you then have to erase.

  5. When everything is measured out, you will use your DIY compass to draw the arch connecting the two vertical lines that you already drew. Once you get it perfect, remove the thumbtack from the wall.

  6. Cut in your arch using your cutting in brush. Cut in on top of the pencil marks that you made unless you want to go back and erase all those marks. Move slowly. Doing this part properly will get the sleek finish.

  7. Use your roller to fill in the arch. Again, go slowly. You don’t want to get too close to the edge.

  8. Add additional coats of paint as needed.

BONUS PRO TIPS:

MONEY SAVER: Line your roller tray with aluminum foil. Dump extra paint back into the can of paint, and toss the foil. You can continue to reuse your roller tray for future projects.

TIME SAVER: Waiting for one coat to dry? Wrap your paintbrush or roller in plastic wrap and set it in the fridge. No need to rinse!

And there you have it! Drawing curved lines on your wall with minimal math and just a tiny hole in the wall.

In my mind, this is the perfect solution to crib wall decor. There is no risk of anything falling on baby or being pulled down by baby. I have toyed with the idea of expanding this arch into a true nursery accent wall by adding additional arches to the wall overlapping one another using the same method. But for now, my weary math hating mind shall rest.

The BEST Lego Storage Hack

LEGO storage organization hack

All parents know there is no pain like stepping on a LEGO. Honestly, that is how my kids have learned most of their more colorful phrases.

Unless you want to invest boatloads of money in a table that has limited storage, there are few options to combat the endless mess that comes with a love of all things LEGO….until now.

I have DIYed the last LEGO storage organization idea that you will ever need. And the final cost was about $50. Do yourself a favor and get supplies for two because a holiday doesn’t go by without LEGO gifts.

All that you need for this LEGO storage hack is this Container Store Poppin brand cube (that doubles as an ottomon/seat) and this LEGO DUPLO baseplate. If your kids are old enough for the original size LEGOs, you will have to try another baseplate that measures 15”x15” like the gray base plate in this bundle.

The baseplate will be installed on the underside of the lid, so measure the base plate before purchasing. The 15'“x15” baseplate that I have fits perfectly inside my storage cube. If it is smaller than 15”x15”, you will see a little of the underside of the lid on the perimeter, but I don’t see any reason why this wouldn’t still function just fine.

I hot glued the base plate onto the underside of the storage cube lid. This didn’t last as long as I would like, so I am going to try some double sided velcro strips. I’m sure there are more ways to attach the two items. Just go through your toolbox to see what you have at your disposal.

And that’s it.

I let all the LEGO sets comingle inside the storage cube. When the kids are playing, they set the lid on their lap and they have a padded tray on which to build. When were’ done, we put the lid on and the LEGO madness is hidden inside.

This organization hack has lasted me years and saved my feet from a lot of LEGO induced pain. And the most recent bonus has been that the cube part of this LEGO organization idea is the perfect height for my one year old to stand and reach for the LEGOs. Anything that buys me some time when ALL of my children are playing, is well worth the price tag.

Backyard Patio Design + DIY

Nothing says perfectly executing timing like finishing an entertaining space in the middle of a global pandemic. Since you, dear reader in Internet world, are one of my first guests to enjoy this space, WELCOME!

When I first started this project, my family and I were spending a large amount of time in our backyard even though it was mess. The physical space around me plays heavily into how I emotionally experience things, so I decided it was time for a change. However, my wallet disagreed.

While I would have loved beautiful limestone and water features, I was on a budget (per usual). After some research and cost analysis, I opted for a DIY pea gravel patio. This option offered everything I was looking for - a defined entertaining space, ease of use and installation, and budget friendly.

If you check out Pinterest, you will see some beautiful pea gravel patios, but don’t get your heart set on any one look too soon! You will find out quickly that the availability of pea gravel in the color that you want depends on your area. In central Florida, pretty much all pea gravel is the orange-ish color that you see here, not the pristine white of Pinterest.

Another thing to consider when choosing your material are the colors of the items that you will be using in the space and the colors of the exterior of your home. I generally keep it neutral with my furniture, and this was no different. The items that I planned to put in the space would be mostly black and white with some pops of blues. The color of my home on the other hand threw me through a loop. My home is a dark redish brass kind of color ( I did not choose it!). While a lot of things would not work with this color, I got lucky with the pea gravel being near the color family of my home. I would avoid a material that only comes in colors that would clash with your home.

At this point, the visual learner in me made a mood board and a plan for execution. You can check out the ideas that I started with in this post - Backyard Refresh. So, we went to work collecting our supplies!

Supplies List

Pea gravel - you will have to calculate how much you need based on the area you plan to cover and the depth that you want the rocks to be

Tiller - this is the machine that will pull up the sod and the roots to give you a blank canvas; usually available for rent at your hardware store. We rented a Mantis Tiller.

Iron rake

Wheelbarrow

Landscape fabric + scissors or X-acto knife

Weed killer

Landscaping edging

Hammer

backyard patio design + diy before .png
backyard patio design + diy after  body .png

So how did we get here? Well, lots of sunburns and sweat earned through manual labor! The process isn’t difficult by any means, but it does take some strength to do it in the dead of summer in Florida.

First thing first, measure the area that you want your gravel patio to be. This will help you determine how much gravel you will need, how much time this will take, and how much tarp and perimeter will be required.

Once you’ve got that down and you are ready to invest some time in this, its time to till. We rented a tiller from the hardware store for just have 1/2 day for an area roughly 30’x 12’. It was the perfect amount of time. We were beginning from a relatively grassy starting point so we had some roots to get through and had to do three rounds of tilling to get to the soil layer you want as the base.

Then it is time to kill some weeds. We sprayed the ground with a weed killer per the instructions on the bottle. PRO TIP: Let the dog out before you do this step. Most bottles say let the product sit far from kids or animals for awhile.

This worked relatively well for us. We’ve got some little weeds popping up, but nothing that we can’t just pick and move on.

After the weed killer has done its thing, lay your tarp down and cut it to fit the area. Cut it a bit larger than you need so that you can be sure to have enough to secure the edging within the tarped area. The tarp should come with pins to secure the tarp to the ground. We went ahead and used the ones provided, and they worked fine. But you could have some longer U shaped pins on hand just in case.

Once the tarp was secured, we installed the landscape edging as our perimeter. This is an affordable plastic border that is nailed into the ground with a stake (provided in packaging) and hammer. It is not the most beautiful, and it does move a bit. But, it fits the budget so that is what we went with for now.

In a perfect world, pavers would have been a great option. But I wasn’t interested in the price tag or the installation required.

Then comes the gravel. These bags are not light. For our patio, we needed 60 bags of gravel. We spread the bags out then opened and spread them in an assembly line fashion. This is the big workout part. Do some stretching.

IMG-0377 (1).JPG

The biggest issue which we are still trying to overcome is the dirt around the edging. We tilled larger than the area that we ended up putting the border around leaving that extra dirt. Obviously, no grass is growing there so we are left with a bit of an unsightly border. Working on it.

All in, this was the most affordable way to go, but it also required a lot of work. It takes some time, but now we have a place to enjoy the evenings once the kids are in bed.

We opted to have a small dining area and a conversation pit out here with some string lights to cozy it up. Once we can host people again, this area will be the place to be!

The final budget came in somewhere around $500, most of that spent on pea gravel. Our second largest single expense was the tiller rental which was only about $50. You’re not going to beat the overall price tag of this project!

you may also like (3).png


DIY Superhero Birthday Party

full view body image .png

Birthdays are a big deal in our house. I love to decorate, bake, wrap, and do everything within my power to let the birthday kid know that today is their day!

So when the pandemic started, I knew that I would be doing most of my planning and prepping with the use of Pinterest, online ordering, and good old fashioned leg work - the trifecta as it were.

I also knew that it would pain my little guy’s heart to not get to see his friends or family for his birthday, so we set up lots of virtual renditions of “Happy Birthday”. What a time to be alive!

Lately, my son has been very into superheroes, the concept of running super fast, saving cities, putting bad guys in jail, etc. so a superhero theme was obvious. Armed with that keyword, I scoured Pinterest and found the following inspiration from Sarom INspired, The House Made Home, and Momo Party respectively.

Then I went to the drawing board for what was realistic and appropriate for my family. I knew I wanted to have some fun activities for a superhero party at home as well as great decorations to set the scene. I settled on Spiderman web target practice (chalkboard web and silly string), a [toddler] life size jail, and superhero dress-up for the whole family as our main activities. Luckily, all of these elements can be used as decorations for a superhero birthday party , helping my bottom line.

I also froze some mini Incredibles figurines in ice the night before. I told my kids that only they could rescue the Incredibles from their icy prison, equipped them with a bunch of kitchen utensils and a cup of warm water and scooted them out back to get to work. They had so much fun figuring out how best to get them out!

IMG_9237.jpg
IMG_9340.jpg

I started collecting Amazon boxes, which are in no short supply at my home. As I collected them I would cover them in kraft paper and draw windows with a Sharpie. These would serve as our city for our heroes to save. I also slowly started cutting out letters to spell BOOM KAPOW ZAP as a banner and small red and yellow triangles from foam paper I had leftover from [many] Halloween costumes. Add a few paper poms and a tiny allegiance of Marvel characters, and the decor was nearly done!

city scape  body image  (1).png

PRO TIP: Anything that you can do gradually, do it. This would not have been fun to do all at once.

Superhero Birthday PArty  decorations

As for the piece de resistance, the jail, it was incredibly simple! I did have to sacrifice a Christmas tree box, but it was worth it. I just eyeballed the size I wanted the opening for bars to be and shaping the opening with box cutters. Then I cut strips of black paper and taped them inside the opening. I covered the whole box with kraft paper and taped black letters spelling out ‘jail’. I did this last element the night before his birthday since it would be hard to hide in our home, and it took about 45 minutes total.

The majority of my evening was used setting up a large balloon display of the number 4. I used gaffing tape, black balloons, and all the hot air my husband is full of to assemble it. After having done this, I would recommend two things - 1) Line the back of the display with construction paper in the same color as the balloons (so that you don’t have to cover every square inch of the wall to make it consistent) and 2)only use one color of balloons. This project was another example of eyeballing it. I placed the larger balloons first to establish the shape of the number and then filled in the holes with smaller balloons as needed.

Superhero Birthday Party Cake

All that was left was a cake! My son had been requesting a robot cake like he had the year prior. My theme-centric mind was not crazed about the inconsistency of a robot cake and a superhero party. I opted to make two cakes and create a robot vs. superhero cake. I placed the final products on a piece of foam board that I decorated to look like a comic book.

All in all, this was an extremely affordable party. All the links for items that I bought are below. I had all the paper products already.

And just in case you’re at a lost for gifts for a four year old, Magnatiles, small Nerf guns, an initial baseball hat, and this pool float with an attached water gun were his favorites!

This post contains affiliate links.

Paper poms

Superheroes

Black balloons

Gaffing tape (this wasn’t my favorite product to work with, but it did get the job done)

‘B’ cape + mask

Black masks for dress up

Silly string for web target practice

4 Tshirt

Incredibles mini figurines

you may also like.png


DIY: How to Stencil Your Concrete Patio

There’s no doubt that stenciling your patio is a cost effective way to add some pa-zow to your patio! That’s right, pa-zow. 

When I say cost effective, I mean that this project cost me only 60 DOLLARS.  And I can reuse the stencil and I have plenty of paint left to stencil the front patio too!

how to stenicl patio  header .png

If you’re willing to be sore for a few days in exchange for a great end product and low cost, keep reading for some advice on how to avoid easy-to-make mistakes when stenciling your patio.  

As a reference, I was starting with a moderately textured concrete slab that was painted white by the builder.


Don’t skip the prep work 

Pressure wash your patio first.  I have this small electric pressure washer that I can easily move around and doesn’t require gas.  I can’t attest for how well it will work if you have some difficult stains, but if you just have your average dirt and build up on your patio, one of these should do the trick.  

Tip:  Don’t get too close to the patio. Even these small pressure washers are strong enough to chip off the paint (if already painted).  

I also kept a leaf blower nearby so that I could get the little layer of dirt that blew in off the slab before I started painting any given area. 

Get the right tools 

Stenciling a patio is different from stenciling a wall.  The texture of a patio is not nearly as smooth as your average wall.  For that reason, you have to work to get paint into the nooks and crannies of the concrete. And that means using a stenciling brush vs. a roller or regular paint brush. 

Also, make sure that your paint is intended for outdoor use.  The Valspar Patio paint is a latex based paint which should hold up well to scuffing and UV damage. This brand also offers pre-mixed colors if you are looking for a standard neutral, or you can get a custom color mixed.  I had my paint color matched to a Sherwin Williams color that I knew would work with the exterior color of my house. More specifically, the Valspar Patio paint has different Base options.  I didn’t know what this meant, but the paint pro was able to determine what I needed based on the project and color I wanted. 

Tip:  I often get nervous when I have to get paint.  I waffle on the color and the quantity as if my life depended on it.  I must have been looking pretty hopeless in the store when a very nice person asked me a few questions and was able to point me in the right direction and get exactly what I needed mixed at the paint counter.  If you have any questions or unusual elements to your specific project, ask the paint desk for help. 

Practice

I went to stencil school.  Relax, it’s just a bunch of Instagram stories on the Yellow Prairie Interiors account.  There are some great tidbits there! 

I rolled some kraft paper out and practiced the up and down motion recommended in the videos.  Dabbing up and down with a stencil brush rather than painting in swinging motions with a brush or roller limits seepage and ensures consistency.  

how to stenicl patio  body image .png

A Little Goes a Long Way 

When you are barely half way done and you would love to just make it go faster, resist the urge to load your brush up with gobs of paint.  It will not end well.  Adding gobs of paint to a tired dabbing motion and a stencil that is likely moving around a bit is a recipe for disaster. 

Tip: If you realize that you have used too much paint on a certain spot, continue dabbing elsewhere until you get most of the paint off the brush.  Then go back to that spot and dab on top of the paint overload.  This will pick up some of the excess paint onto the brush. 

Take Your Time

I am not kidding when I recommend stretching your back before you get started.  The positions that you will get into for an extended period of time will do a number on your body, especially your back.  If possible, I would recommend taking a day or so between stenciling to give your body a break.  It is truly exhausting.  This is a marathon not a sprint. 

Start in the right spot 

This was my major hiccup - I started in the corner of my patio and tried to stencil down and across at the same time.  Meaning that as the across pattern was drying, I would try to make good time and start going down.  Well, eventually the two will meet.  If you’re lucky and extremely precise, they will line up pretty well.  If you’re cockeyed a smidge, it will get messed up.  My husband, who has a mind for geometry, said that I should have started in the middle of the patio and worked my way out.  I’ll try this when I stencil the front patio next.  


Now, if you still have the urge to stencil a concrete patio, do it!  I love the end result so much.  It adds a little flare to what was previously a really blah area.  Here’s exactly what I used to stencil my patio: 

Stencil Brush 

Valspar Patio Paint 

Cutting Edge Stencil - Starburst (Tip: buying from Etsy vs. their website gives a small discount in shipping)

Many lists for projects like this will also include a level.  Well, being the genius that I am, I didn’t realize that when I tried to determine if my stencil was level on the patio, the level was picking up and determining the level of the actual concrete slab.  So after that, I tossed the level and eyeballed it. 

As a wannabe DIYer, this is a great first project! I had a few missteps, but nothing that couldn’t be fixed.  And worst comes to worse, put a rug or some furniture on top of the error and call it a day!

you may also like.png


DIY Window Seat Wall : Before and After

If you’re just looking for sources, head to the bottom of this post.

Call me #Influenced. After one trip to Lowe’s, I caught the DIY/hack bug. At around the same time I saw that Regan at The Blooming Nest was installing a window seat and I discovered Jess at CarcabaRoad do a sponge paint wall. My coffee fueled brain thought, “Hey, I could do that”

The target? Our sunroom.

The goal? Make it a defined room in the open living area and a functional space that can store toys.

Before I unveil the before image, let me just say that our ‘sunroom’ is more of a bump out. It is by no means a room. However, it is the part of the main living area that gets the most sun. Boom- that makes it a sunroom.

Also, before getting into the nitty gritty, I was on a budget. We are in a big time savings mode right now so I wasn’t looking to spend more than a few hundo here.

So here she is before:

IMG-2891.JPG

Burns the eyes a bit, no? I cannot tell you the passion with which I hate those chairs. I bought them on a whim to use in our old house and kept them just to fill the space. I was never sure what to do in terms of window treatments here since we have long drapes on either side of this room. I felt like drapes were too much but I didn’t want to go to the expense of ordering a valence nor did I think that was a great DIY place to start with all the sewing and woodwork required.

I’ll take you through the whole design process below, but here is the design plan that I started with to get this project rolling.

Copy+of+window+seat+design+plan++%281%29.jpg


I decided that a feature wall would be ideal - something that makes a statement, but doesn’t require much time, effort, or know-how. AKA right up my alley!

DIY Sponge Wall

I had just seen a DIY sponge painted accent wall on Carcaba Road. The supplies were minimal and the skill level seemed low.

Supplies:

Sponge

Scissors

Paint

Paper Plate

How To:

Snip the corner of the sponge at a 45 degree angle

Pour the paint onto the paper plate

Dip the sponge and start making your lines

Tips:

Don’t buy a whole gallon of paint to start. I literally did my wall with just the sample.

Do a few practice lines on a sheet of paper, paper bag, etc.

Start somewhere inconspicuous so that you can feel out the size and placement on the wall

Window Seat

IMG-2840.JPG

Then I set my sights on a window seat. Having a background in interior design and home building, I knew the carpentry work to make a built in window seat was not in the budget right now. So what’s a girl to do? Go to Pinterest!

Pinterest had a wealth of beautiful images of sunrooms with window seats. I began to see the IKEA hack of the Kallax system to turn it into a window seat. I thought this would be a great option. My biggest concern was that I would have to remove the baseboard trim where I wanted the window seat so that it would sit flush against the wall. Alternatively, I could also order feet to attach to the base of the window seat to raise it above the trim.

I measured the wall and ordered the Kallax single bookcases to fit. We (read: my husband) assembled the first one and put it on its side flush with the trim. To my delight, it fit perfectly between the baseboard and the window sill so that there was no need to remove the trim!

My original design plan and budget included cushions, but I knew those could get pricey so I wanted to see the Kallax in place before buying anything. Once I saw how my boys climbed on it, I realized that cushions wouldn’t be ideal right now. They would slide around and likely just be thrown off so that the top of the seat could be used for Hot Wheels. My budget breathed a sigh of relief.

I grabbed some pillows from Target to warm up the space a bit. They add some texture and color which the area needed. The lumbar pillow is actually an indoor/outdoor pillow so hopefully it will hold up to three kids.

Sconces

The final piece of the puzzle was sconces. Since I knew I wasn’t going to do any sort of window treatment aside from the woven shades we already have, I knew visually the room needed something at this height - near the top of the windows.

My brain harkened back to Nesting with Grace and her magic light trick. A few Amazon searches later, and I had found some sconces that were reasonably priced and worked with the fixtures we had throughout the rest of the open concept space.

With the magic light trick in hand and zero interest in doing any sort of electrical work, I opted to snip the cord on the back of the sconce and install it on the wall. Inside the can of the light is industrial velcro and attached to that is a puck light.

The exact puck lights that we got are cool lights which aren’t my favorite. But these lights also have a bunch of color options - great for holidays- and they have a strobe effect - great for late night dance parties to release a little energy.

And that’s pretty much it! I had the runner that is in front of the window seat elsewhere in the house and the same goes for the rug under the chalkboard. I love how these rugs define the two areas, but also unite them. The rugs are from the same family, but obviously different colors and shapes.

This project took me about 10 days to complete from inception to conclusion including all ordering/lead times. Once the actual products are all in hand, you can complete this in an afternoon.

I strayed from the original design plan by skipping the floating shelves on the side. My husband really wanted to sit on the window seat to read when the babies nap, and the shelves would have had to be in a weird place to accommodate his height. I also didn’t paint the top of the seat. I want to see how it wears without it first.

All in I spent just under $400 - most of that on the sconces. Right in line with what we had agreed upon.

Sources

Paint Color: Valspar colormatch to Farrow and Ball Pigeon 25

Window Seat: IKEA Kallax Single

Baskets: IKEA Fladis (small)

Pillows: White + lumbar - Target

Sconces

Runner

Circular Area Rug

Throw: old Target but similar here

Faux tree

Plant pot: Bathroom trash can from Target

This post contains affiliate links. An affiliate link means that I may earn a referral fee if you make a purchase through my link without any extra cost to you. Thanks for your support!